Firstly, what is a Diesel Heater and do I need one?
A diesel heater for caravans is a highly efficient and versatile heating solution designed to provide optimal comfort during cold weather travels. Compact and easy to install, these heaters utilize diesel fuel to generate a steady and cost-effective source of warmth within the caravan’s interior.
Diesel heaters are simple in their design and very efficient to operate, making it my #1 choice for heating your van.
I won’t dive any further into it than that, but if you want to know more about the mechanics of it you can see a good description here – https://warmda.com/how-does-the-diesel-heater-work/
How to install a diesel heater in your caravan?
Step 1 – Choose Your Heater
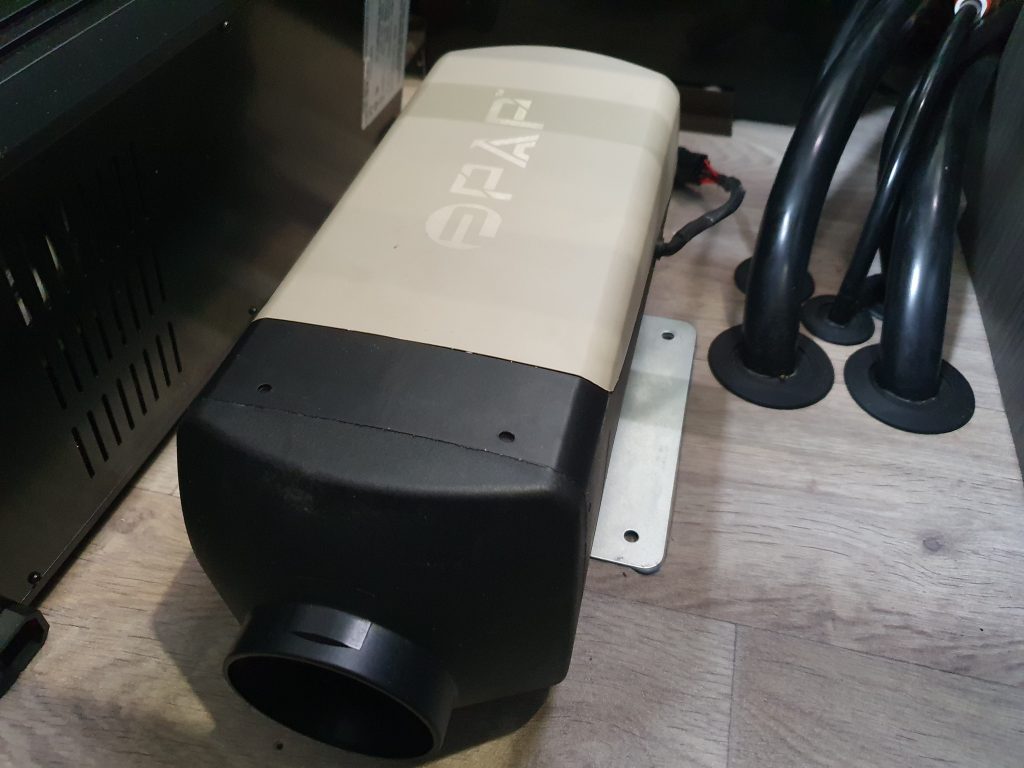
I just went and Ebay heater (aka Chinese Heater), I went with a PPAP heater because they seemed to have good reviews and a 2 year warranty. It was probably an average of $50 more expensive than the Chinese counterparts, but for an Australian seller and an extra year warranty, I can wear the difference.
What size do you need? 2kw/3kw/5kw? I have a 22ft Jayco Journey Outback, hard top. I went with a 3kw and it does the job just fine, I had a tight space to work with so couldn’t fit a 5kw. I would say 1 x 2kw or 3kw would be ample for most vans.
Here’s what I picked – Diesel Heater *
* Mine is the model without Bluetooth
Step 2 – Gather your tools and a couple of other bits and pieces
Ok so what you’ll need –
- Hole saw set
- Drill
- Vacuum
- Drill bit set
- Tape measure
- Socket set
- Screwdrivers
- Stanley knife
- Flexible diesel gasket sealer (for the fuel stand)
- Pliers & crimper (if you need to extend the cable for the fuel pump)
- 10mm & 7mm spanner
- Fire seal Mastic & caulking gun
- Fuel tank cover, I got one to mount on my rear bar from Yarra Supply, looks good and easy to install.
- 100mm galvanized downpipe dropper, this is to protect your pipes where they go through the floor and prevents the exhaust transferring heat to your sub-floor.
- An extra Carbon Monoxide alarm. Just because I’m extra cautious. The smoke alarm in the Jayco comes standard with a Carbon Monoxide alarm.

Step 3 – Pick a location
This one simple, it’s up to you really. My advice would be to be as close to the battery as possible to you don’t have to extend any cabling from the wiring harness, while also trying to be close to the fuel tank & pump. Being further from the pump and tank is less of a hassle as you will only have to extend the fuel pump cable, which is just a twin (positive and negative) from the controller to the pump.
For me I had a café style seating arrangement in my Journey, under one seat I had my battery and inverter, but still enough room for the heater. You will need to also make sure you have a clear space to get through the floor, you will need to drill a 100mm hole through your floor after all! Jump underneath and measure all your structural elements of the van, as well as where water pipes and cabling travel.
Measure once, twice, and thrice!!

Step 4 – Drill the Hole
The worst step of all, drill through the floor! Once you have everything marked out its time to take the drill to the van. My advice is to set everything out with masking tape, drill a small pilot hole in the centre of the soon-to-be 100mm hole and then jump underneath and check all your clearances again, you’d be surprised how often you think you have all your measurements right!
Once all good drill half way from the top and jump underneath and drill the rest of the way, this will give you a nice clean 100mm hole and won’t splinter off any ply wood.
Sit your dropper in to make sure it fits, but don’t mastic anything in yet.

Step 5 – Mount the base plate to the diesel heater & cut out the vinyl
IMPORTANT – do this step now, before screwing and sealing the base plate to the floor. It will make your life a lot easier, trust me.
Once you’ve done that drop the heater into place and mark out around your plate. The base plate does get quite hot when the heater operates so I cut the vinyl out to expose the plywood flooring.
Step 6 – Install pipe work and secure the heater in place
Put a good layer of heat-proof mastic on the down pipe dropper and put it in place.
Next, double check you have secured the air intake, exhaust and fuel line to the diesel heater. Its much easier to tighten all these up now before you secure it to the floor.
Now take the fireseal mastic and put a good layer on the plywood flooring, and the base plate, remember this will be a weatherproof seal as well as a fire-resistant layer. Now drop the heater in place, screw it to the floor and jump underneath to tidy up and mastic.

Step 7 – Mount the exhaust
Ok so this pipe gets EXTREMELY hot. Make sure it is taking the shortest path directly to the perimeter of the van and don’t secure the pipe to anything else except the muffler. Make sure the pipe is on a slight downward slope from where it exits the van to the perimeter of the van. Then secure the muffler, with the 2-3mm ‘weep’ hole facing down. Use the suppled bracket and done! You’ll probably find you might need to modify or extend the supplied bracket to get it where you want it, the pipe is very rigid.
Step 8 – Mount the air intake
I made sure I tucked this up in the opposite direction from the exhaust to make sure there was no chance of sucking in diesel exhaust.
I also tucked it up behind a piece of the chassis so no on-coming bugs/dust/rocks got up into it. This is an easy install and just cable tied out of the way.
Step 9 – Route the fuel line & fuel pump power cable to the fuel tank and attach pump and filter. And maybe extend the fuel pump cable.
Find a clear run, preferably with your pipe work or cable looms and run the fuel line to the tank. Make sure its clear of anything that will produce excess heat and it will be fine.
Next mount the fuel pump, now this pump makes a really annoying ‘ticking’ noise when in operation, so mount this as far away from sleeping areas as possible. Use the supplied rubber stop when mounting it to further reduce the noise. Make sure it is mounted on a 45-degree downward angle for easier operation.
My advice would be to put this pump as close to the fuel tank as possible. There are plenty of forums that say these things are better at pushing then pulling, so reduce that pulling distance as much as possible.
Secure the fuel filter on the tank side of the pump and sun the fuel line the rest of the way to the tank.
My pump was quite a distance from the heater so I had to get a few metres of twin cable and extend the cable line. Red to red Black to black, job done.
Step 10 – Install the fuel stand in the fuel tank.
This one is personal preference, either install the fuel stand or use the tap at the bottom. I opted for the fuel stand because I could stop it 20-30mm from the bottom of the tank to prevent it from blocking if I got any debris in the tank. I also wasn’t that confident a seal would be maintained at the bottom of the tank If I used the tap at the bottom.
Drill a hole at the top of the tank, on the opposite side of the fuel cap. Bent the fuel line strategically to dodge the built in baffles. Then insert into place. My advice would be to use some diesel gasket sealer when securing the stand to the tank, the tank they supply is very thin and flimsy so hard to maintain a seal.
Step 11 – Mount the fuel tank and connect the line.
Mine was very simple, secured the tank to the holder and then mounted to the rear bar using U-bolts. I didn’t have a diesel jerry can on me so I took my tank for a drive prior to installing it to fill it up.
Connect the fuel line from your filter to the stand and we’re all done here.
Step 12 – Pick a spot for your hot air vent inside the van
Again, I picked a simple spot for a simple install. The kit came with a tee piece and enough ducting to spread your vents out throughout the van, but I just chose to install one in the cabinetry directly infront of the diesel heater.
Measure your tube and your hole and attach with the provided pipe clamps.
Use a small pilot drill for the screws to prevent splintering any timber when securing the vent.
I decided to install the second vent as an ‘air intake’ because of the enclosed space and I was only going to throw it out if I didn’t find a use for it.
Step 13 – Connect the wiring loom to the battery or Jayco J-Hub. Wiring your diesel heater to the J-hub
My install location was adjacent to the J-hub location so this was a simple run, I cable tied the loom neatly out of the way and tucked it through the hole in the back corner of the cabinetry to reach the J-hub.
Once I had the loom in there I was able to connect to the J-hub. Line 14 was unused in my Jayco Journey outback so I connected the cables accordingly to there. This is the best option if you aren’t using a shunt as you can see the power being drawn by the diesel heater on your Intellijay app.
Line 14 came pre-installed with a 15A fuse that I decided to leave in place, in the diesel heater kit I was supplied with a 20, but I figured if the 15 blows I’ll swap it out at that point, 15A is ample.
Step 14 – mount the LCD display.
I’ll be honest, finding a pathway from the J-hub cabinet near the battery up to where the existing displays were was just too hard, and involved some drilling that I did not want to do.
The LCD display got some double-sided tape and stuck to the door on the inside of the J-hub cupboard. I thought I might move it later, but its really not an issue. The diesel heater comes with a remote that we predominately use anyway.
Step 15 – mount the carbon monoxide monitor
If you over think things like me, then you likely bought an additional monitor like me. I installed this close to my fresh air intake as a fail-safe.
Step 16 – Pair your remote and change the display from Hertz to Celsius
Pairing the remote is simple with the supplied instructions. However, what they don’t tell you is that you need to change the display from hertz to Celsius.
To do this hold the settings button down at the same time as the ‘up’ button, and it will switch over.
Conclusion
A diesel heater, in my opinion, is one of the best additions to your caravan. It will keep you toasty warm while using a couple of
dollars in diesel and chewing hardly any battery.
We’ve had ours installed for over 12 months now and hasn’t missed a beat!
 Ultimate Guide to Tyre Pressure for Beach Driving, Towing & 4WD Adventures (Australia) 2026 Guide
 12V or 24V – Which Voltage Should you Choose for your 4×4, Camper or Caravan?
 What is an Inverter and what size Inverter do I need for my Caravan 2026?
 LiFePO4 or Lithium-ION. Understanding the Difference of LiFePO4 and Lithium-ion Batteries
 Choosing the Right Auxiliary Battery for Your Caravan, Camper, RV or 4×4 (2026 Guide)
 Unveiling the Hidden Gems: The Top 5 Must-Do Experiences in Cape York, Australia

